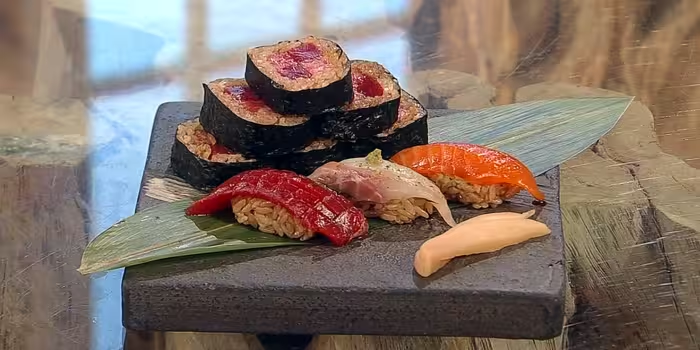
Masaki Sugisaki’s masterclass in how to make authentic Japanese sushi at home. Glossy sushi rice is topped with lean tuna, sea bass and lightly cured trout, lifted by wasabi, shiso and yuzu, while the British tuna rolls showcase three cuts of tuna – akami, chu-toro and o-toro – in a striking chequerboard pattern. Served with homemade tsukuri soy sauce and pickled ginger, this is healthy, dairy-free sushi at its most impressive.
Jump To Recipe By Masaki Sugisaki
From Saturday Kitchen

Lean raw fish, vinegared rice, seaweed and fresh herbs make this homemade sushi a Nutri-Score B. It’s rich in omega-3 protein from the tuna, sea bass and trout, low in saturated fat and free of dairy – the only watch-outs are the sugar in the sushi vinegar and salt in the soy sauce.
Estimated nutrition per serving (approx.): 520 kcal | Fat 14g | Carbs 72g | Sugars 9g | Fibre 2g | Protein 34g
Shop the Recipe
The kit that makes this recipe easy:
Sushi mat – ESSENTIAL for success – it rolls the nori and rice around the chequerboard tuna filling evenly and presses the rolls into a neat square shape.
- Rice cooker – an upgrade on a saucepan for cooking perfectly steamed sushi rice every time, great for lots of other recipes too.
- Wooden Sushi rice tub – for cooling and folding the vinegared rice without crushing the grains.
- Santoku knife – for slicing the fish and cutting the rolls cleanly in one pulling motion, a must for sushi.
- Fine sieve – for straining the tsukuri soy sauce silky smooth.
- Saucepan with a lid – for making the sushi vinegar and simmering the rice gently.
- Colander – ideal for draining and resting the washed rice.



Ingredients
For the sushi vinegar
- 100g/3½oz rice vinegar
- 70g/2½oz caster sugar
- 20g/½oz salt
- 3g kombu seaweed
For the sushi rice
- 450g/1lb Japanese sushi rice
- 170g/6oz sushi vinegar (see above)
For the tsukuri soy sauce
- 150g/5½oz soy sauce
- 40ml/1½fl oz sake
- 40ml/1½fl oz mirin
- 5g kombu seaweed
- 5g bonito flakes
For the nigiri sushi
- 100g/3½oz lean tuna (akami), suitable for eating raw
- 100g/3½oz sea bass fillet, skinned and pin boned, suitable for eating raw
- 100g/3½oz trout fillet, skinned and pin boned, suitable for eating raw
- sushi rice (see above)
- tsukuri soy sauce (see above)
- 30g/1oz fresh wasabi (or wasabi paste)
- 2 shiso leaves
- 5g yuzu kosho
- 1 fresh yuzu
- salt and sugar, for curing the trout
For the tuna sushi rolls
- 4 nori sheets
- 360g/12½oz sushi rice (see above)
- 200g/7oz lean tuna (akami), suitable for eating raw
- 100g/3½oz medium-fatty tuna (chu-toro), suitable for eating raw
- 100g/3½oz fatty tuna (o-toro), suitable for eating raw
- fresh wasabi (or wasabi paste)
To serve
- gari (pickled ginger)
Customise
Ingredient swaps that hold up:
- Swap the sea bass for sustainably farmed salmon or bream – both slice beautifully for nigiri.
- Replace the trout with salmon fillet if you prefer, curing it the same way with salt and sugar.
- Use wasabi paste instead of fresh wasabi if fresh root is hard to find.
- No yuzu? A little finely grated lemon or lime zest brings a similar fragrant citrus lift.
- If you can’t source chu-toro and o-toro, use all lean tuna for the rolls – still delicious.
Method
Make the Sushi Vinegar (10 minutes, plus overnight infusing – do this the day before)
- Gently heat the vinegar mixture. Put the rice vinegar, sugar and salt in a saucepan over a low heat. Warm it slowly to 50C, stirring with a whisk – no rushing here, as gentle heat keeps the vinegar bright and clean-tasting.
- Dissolve completely. Take the pan off the heat and keep stirring until the sugar and salt have fully dissolved. Don’t worry if it takes a minute or two; patience pays off.
- Infuse overnight. Drop in the kombu and leave the mixture to infuse at room temperature overnight. This is the step that gives your sushi rice its deep, savoury backbone, so plan ahead – it’s worth it.
Make the Tsukuri Soy Sauce (10 minutes, plus cooling – also done ahead)
- Warm the sauce base. Put the soy sauce, sake, mirin and kombu in a saucepan over a medium heat and bring everything gently to the boil. Easy does it – you want a soft bubble, not a rolling boil.
- Simmer with bonito. Add the bonito flakes, turn the heat down and simmer gently for 3 minutes. Those flakes work their umami magic fast, so don’t overdo it.
- Cool and strain. Remove from the heat and leave to cool completely, then strain through a fine sieve lined with kitchen paper. You’ll end up with a beautifully clear, glossy dipping sauce. It keeps happily in the fridge for days.
Wash and Cook the Sushi Rice (45 minutes–2 hours 10 minutes, including soaking)
- Wash the rice properly. Put the rice in a large bowl, cover with cold water and gently swirl it around with your hand, then drain straight away. Repeat two or three times until the water starts to look clearer. This isn’t fussiness – it’s how you get distinct, glossy grains.
- Polish the grains. Drain off as much water as you can, then gently rub the rice between your hands in a circular motion to remove any lingering bran. Add fresh water, swirl and drain again, repeating until the water runs clear rather than cloudy.
- Rest the rice. Tip the rice into a colander and leave it to drain for 10–15 minutes, tilting the colander slightly so any excess water runs off.
- Soak before cooking. Put 450ml/15fl oz water in a lidded saucepan and gently add the washed rice. Leave it to soak at room temperature for anywhere from 30 minutes to 2 hours – longer soaking means more even cooking, and you can easily do this while the vinegar infuses.
- Bring to the boil. Cover the pan with its lid, put it over a high heat and bring to the boil until steam begins to escape. Keep the lid on – curiosity is the enemy of good rice!
- Simmer and steam. Turn the heat down to low and simmer for 10 minutes, then switch off the heat and leave the rice, still covered, for another 10 minutes to steam. Resist lifting the lid the whole time – that trapped steam is what cooks the rice through perfectly.
Season and Cool the Rice (10 minutes)
- Fluff gently. Remove the lid and gently fluff the rice with a rice paddle or spatula – think folding, not stirring, so the grains stay whole.
- Fold in the vinegar. Transfer the rice to a wooden sushi rice tub or large bowl and drizzle over the sushi vinegar. Fold it through with the paddle, taking care not to crush the grains – a slicing-and-turning motion works best.
- Fan until warm. Fan the rice until it’s just warm to the touch; this quick cooling gives it that lovely sheen. Cover with a damp cloth until you’re ready to shape. (If you own a rice cooker, this is where it earns its keep on future sushi nights.)
Prepare the Fish and Tezu (15 minutes)
- Mix your tezu. Combine a little water with a splash of sushi vinegar to make tezu – the trick that stops rice sticking to your hands. Keep the sushi rice, fish and wasabi nearby, along with a damp cloth for wiping your hands and knife. Everything within arm’s reach makes shaping feel effortless.
- Slice the tuna. Lightly cure the tuna in soy sauce, then, using a sharp santoku knife, slice against the grain into pieces about 7–8cm/2¾–3¼in long, 2.5–3cm/1–1¼in wide and 5mm/¼in thick. Use one long pulling motion for each slice – a smooth draw, never a saw.
- Slice the sea bass. Slice the ike-jime sea bass against the grain into pieces of the same size. Uniform slices make for professional-looking nigiri.
- Cure and slice the trout. Lightly cure the ike-jime trout with salt and sugar, then slice it against the grain the same way. That gentle cure firms up the flesh and deepens the flavour beautifully.
Shape the Nigiri (20 minutes)
- Shape the rice. Lightly wet your hands with tezu and shape 15–20g/½–¾oz of rice into a small oval for each nigiri, being careful not to squash the grains. Light hands make light work here.
- Build the tuna nigiri. Lay a slice of tuna in your palm, spread a little wasabi over it and top with the shaped rice.
- Build the sea bass nigiri. Put a slice of sea bass in your palm, add a small piece of shiso leaf and a little yuzu kosho, then place the rice on top. Finish with a little freshly grated yuzu zest for a fragrant, citrusy flourish.
- Build the trout nigiri. Place a slice of trout in your palm, spread over a little wasabi and top with the rice.
- Press and shape. Gently press the rice onto the fish, then turn the nigiri over and shape it with two fingers so the fish sits neatly draped over the rice. A couple of gentle presses is all it takes – confidence grows quickly with practice.
- Finish with soy. Brush or dab the tuna and trout nigiri with a little tsukuri soy sauce. Done well, this replaces dipping at the table and keeps the rice intact.
Roll the Chequerboard Tuna Rolls (25 minutes)
- Cut the tuna batons. Cut the three cuts of tuna into batons about 10cm/4in long and 8–9mm/⅜in square. Try to keep them even – that’s what makes the chequerboard pattern pop.
- Set up the mat. Put a sheet of nori, shiny-side down, on a sushi mat with the long edge facing you.
- Spread the rice. Wet your hands with tezu and spread 90g/3¼oz of rice evenly over the nori, leaving a 1.5cm/⅝in strip uncovered along the far edge – that bare strip seals the roll later.
- Arrange the chequerboard. Spread a thin line of wasabi across the centre of the rice, then arrange four tuna batons in a two-by-two square, alternating the different cuts to create that striking chequerboard pattern. Take a moment to enjoy how good it looks!
- Roll it up. Lift the near edge of the mat and roll it over the filling, holding the tuna in position with your fingertips. Press gently, then keep rolling to seal the nori along the bare strip.
- Square it off. Gently press the roll through the mat to shape it into a neat square, then leave it seam-side down for a minute to settle.
- Cut cleanly. Using your sharp knife wiped with a damp cloth, cut the roll in half, then cut each half into three pieces. Wipe the blade between every cut – a clean knife means clean, show-stopping slices.
- Repeat. Roll and cut the remaining ingredients the same way. You’ll be surprised how quickly the rhythm comes.
Serve (2 minutes)
- Plate and enjoy. Arrange the nigiri and tuna sushi rolls on serving plates with the pickled ginger alongside, and serve with the tsukuri soy sauce for dipping. Sit back and admire your handiwork – homemade sushi this beautiful deserves a moment of applause.
Additional Notes
- The sushi vinegar and tsukuri soy sauce can both be made a day ahead, which breaks the recipe into relaxed stages.
- Always use fish labelled as suitable for eating raw, from a trusted fishmonger.
- Keep a bowl of tezu and a damp cloth beside you while shaping – dry hands and rice are a sticky combination.
- Yuzu kosho and shiso leaves are available from Japanese grocers or online and keep well in the fridge or freezer.